
There’s no laser. No titanium grappling hook, no lock that pops open if you stare at it hard enough. Before I got into physical pentesting, that’s genuinely what I pictured: some James Bond 10-in-1 pencil that cuts through steel.
The real kit is less impressive and a lot more interesting. It’s a backpack full of simple, cheap, almost boring objects. A bent metal hook. A can of compressed air. A fake badge on a lanyard. Some of them cost less than lunch, and not one is clever on its own. What makes them dangerous is the person holding them knowing exactly when, and how, to use each one.
This is that kit, tool by tool, and the job each one does. It all lives in the bag permanently. Some of it I’ve already put to work on a real engagement, and some I’m still waiting for the right chance to use in the field. I’ll point out which is which as we go.
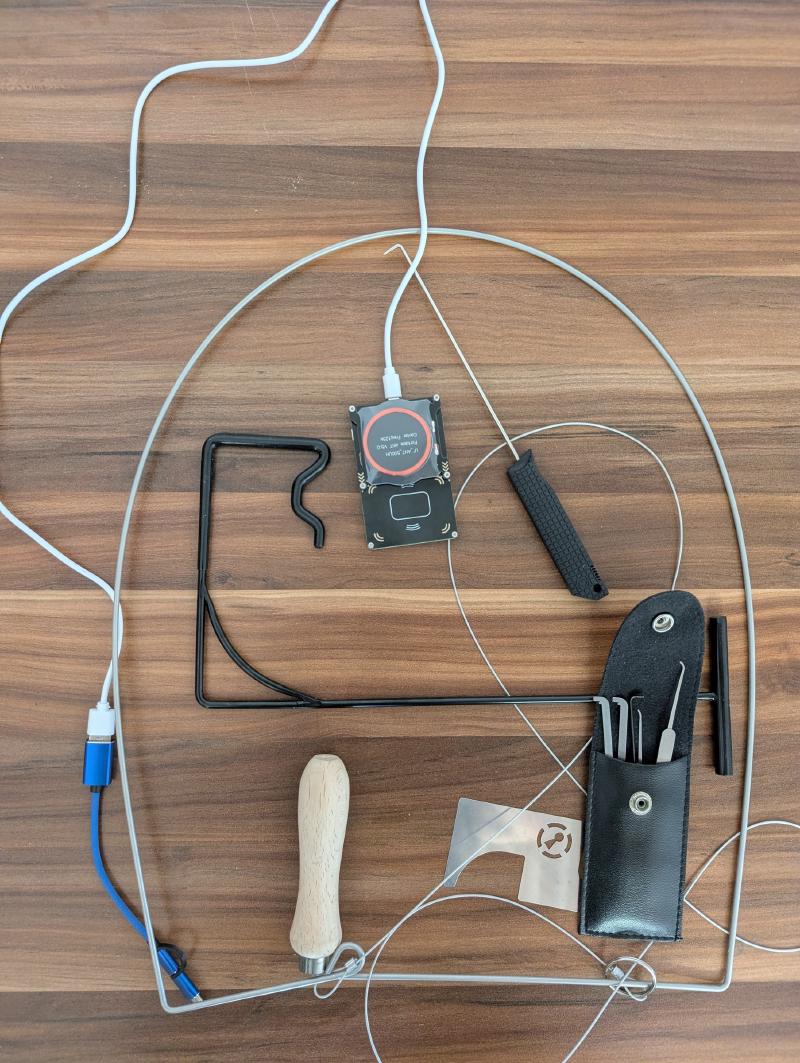
The traveler hook (latch slip) #
First up, the traveler hook. It looks like a screwdriver, or one of those picks your dentist puts in your mouth to scrape your gums, but this simple piece of metal is surprisingly powerful.
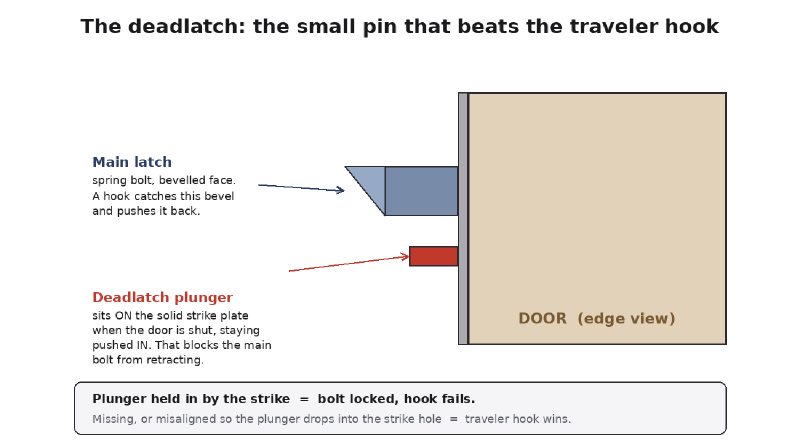
It exploits weakly installed latches. The spring latch on most doors has an angled face (the bevel) so the door can close without a key: you push, the latch rides up the strike plate, snaps back into the hole, and you’re locked. That same angle is the vulnerability. You slide the curved end of the hook in beside the latch (in Bulgarian we actually call it the “tongue”), catch that angled face, and push the bolt back into the door until it clears the frame. The door swings open. No key, no badge.
The reason this matters so much is where it works. A door can be guarded by an expensive RFID reader and still fall to a two-euro hook, because you’re not attacking the lock or the reader at all. You’re attacking the latch, the dumb mechanical part that every one of those systems still relies on. The fancy electronics decide whether the strike releases, but the bevelled latch is what actually holds the door, and it doesn’t know the difference between a key and a hook.
The defense, by the way, is a deadlatch: a little secondary plunger next to the main latch that, when the door is shut, sits depressed against the strike and locks the main bolt so it can’t be pushed back. Plenty of doors either don’t have one or have it misaligned so the plunger drops into the strike hole instead of staying depressed, which defeats the whole point. You would be surprised how many doors out there are wide open to a tool this basic.
Video: Travelers hook opens doors fast by Newhouse Lock and Key.
The Under Door Tool (UDT) #
Honestly my favourite, even though I haven’t used it on a real engagement yet.
The Under Door Tool opens a door from the inside without you being inside. It’s a long, flat, stiff arm with a cord (basically a fisherman’s line) threaded through it. You feed the arm under the gap at the bottom of the door, hence the name, pivot it up on the far side, hook the cord over the lever handle, and pull. The handle drops exactly as if someone inside pressed it, the latch releases, and you walk through.
The catch is in that word “lever.” A UDT needs a handle it can hook and pull down. Lever handles are everywhere because they’re required for accessibility in a lot of commercial buildings, which is precisely why this works so often. Round knobs defeat it (nothing to hook), and so does a tight threshold or a door sweep that closes the gap at the floor. So part of the skill is reading the door before you ever kneel down: lever handle plus a visible gap underneath equals a candidate.
The defenses follow from that. Permanent fixes close the door’s weak points: a door sweep or astragal to kill the floor gap, and a lever shield (an escutcheon or guard around the handle) so the cord has nothing to catch. There’s even a dead-simple field fix you’ll see demoed in talks: loop a cloth or strap around the inside lever so it can’t be pulled. It looks silly, but if the handle can’t move, the tool can’t open the door.
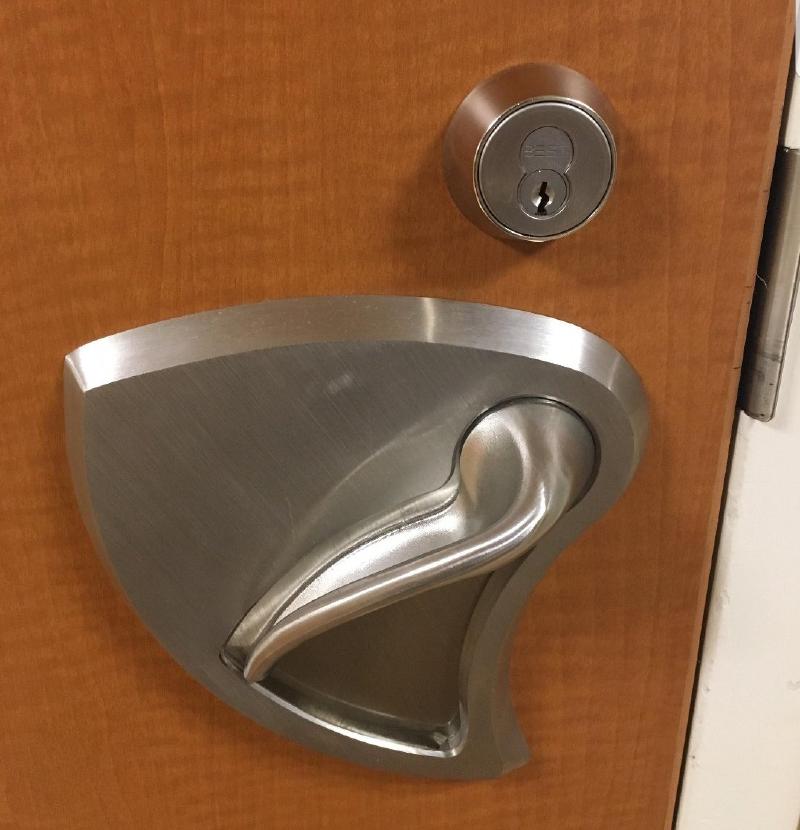
It shines on doors that only open from the inside, where the outside has no handle to work with at all. Think a hotel room door as the mental model. (Obviously you’re not going around opening random hotel rooms.) And despite how long it is, it folds or rolls down small enough to ride in a backpack, or even worn like a belt, so it travels far better than its size suggests.
Video: Under Door Tool assembled at SANS Orlando by DeviantOllam.
The double door tool #
The name gives it away. This one’s for pairs of doors that meet in the middle and are held shut by a push bar (a panic bar, or “crash bar”) on the inside, the horizontal bar you shove to get out of any cinema or office in a hurry. Those bars exist for life safety: in an emergency you should be able to leave by just leaning on the door. Convenient for escaping a fire, equally convenient for an attacker.
You feed the tool through the gap where the two leaves meet, hook the bar on the far side, and push. The bar depresses exactly like someone leaning on it from inside, and the door opens. Quick and quiet, no tools touching the lock.
It depends entirely on there being a usable gap between the doors. The defense is to kill that gap: an astragal (a vertical strip that covers the seam between the two leaves) blocks the tool from getting through, and properly fitted doors with vertical rods top and bottom are far harder to pop this way.
Video: J-Tool / Double Door Tool by Coastal Fire Training, LLC.
Lockpicks (tensioner, rake, hook) #
Lockpicking is a rabbit hole you could write a whole book about and still not finish, so here I’ll just cover what’s in my bag and the idea behind it: a tensioner, a rake, and a hook.
To pick a standard pin-tumbler lock you’re exploiting tiny manufacturing tolerances. The cylinder has a row of spring-loaded pin stacks that normally straddle the shear line (the gap between the rotating plug and the housing) and block it from turning. The correct key lifts every stack so the break in each one sits exactly on that line, and the plug spins. No two pins ever bind at precisely the same instant, so you can set them one at a time.
- The tensioner holds light rotational pressure on the plug, the same direction the key would turn. That tiny twist is what makes a lifted pin “stick” at the shear line instead of dropping back. Nothing happens without it, and too much pressure is the most common beginner mistake.
- The rake is the brute-ish approach. You scrub it in and out to bounce all the pins at once and hope a loose, cheap lock falls open fast. Noisy, quick, and great against weak mechanisms.
- The hook is for single pin picking: finding the one pin that’s binding, setting it, feeling the plug give a hair, and moving to the next. It’s slower but it’s how you beat better locks, especially ones with security pins (spool and serrated pins) that are shaped specifically to fool raking and give false sets.
Here’s the thing most beginners get backwards though: picking is usually a last resort, not the opening move. It’s slow, it needs skill under pressure, and you’re crouched at a door looking exactly like someone breaking in. Every bypass we’ve covered so far (latch slipping, the UDT, the double-door tool) beats picking on speed and on how normal you look doing it. Add to that pulling the hinge pins if the hinges face you, and the oldest trick of all: asking someone to open it for you. People are kind. Use it. Bonus points if you look like you’re in a rush with your hands full and someone holds the door out of pure politeness.
(That social-engineering side is a big enough topic that I think it deserves its own post rather than a paragraph here. More on pretexts and tailgating soon.)
A can of compressed air (the REX trick) #
A surprising one. The can of air isn’t there to clean the client’s keyboards. It’s there to fool their REX sensor.
REX stands for “request to exit.” It’s the sensor that unlocks a door when someone walks up to leave, so people aren’t badging out of every room, same basic idea as the automatic doors at a mall. Most are passive infrared (PIR) motion sensors mounted on the ceiling or wall inside, aimed at the approach to the door. They exist because fire and life-safety codes require that people can always get out of a building, even when getting in is fully locked down. That hard requirement is the weakness: the door has to honour an exit request, and the sensor can’t tell a real person from a trick.
A PIR sensor doesn’t see shapes, it sees changes in infrared (heat) across its field of view. Flip a can of compressed air upside down and what sprays out is the liquid propellant, which comes out freezing cold. Mist that through the gap at the top or bottom of the door into the sensor’s field and the sudden cold blooming across the lens reads as motion. The sensor fires the REX, the strike releases, and the door opens for you from the outside.
Video: Request-to-Exit (REX) sensor bypass with canned air by Brent WeHackPeople.
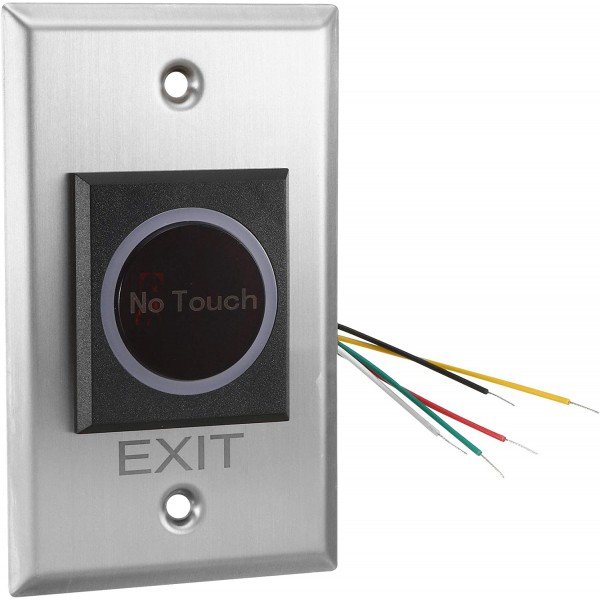
The real fix is to stop relying on a heat-sensing motion sensor for the exit at all, because a plain PIR is exactly what the cold-air trick fools. The hardened options use a different sensing technology: a dual-technology REX that combines PIR with microwave/radar and only releases when it sees genuine movement and heat, so a blast of cold gas alone isn’t enough, or better still a dedicated request-to-exit button at the door itself, whether a mechanical push-to-exit or a short-range no-touch pad. The point is that you have to act deliberately right at the device, not just be sensed walking up to it. A button at hand height on the inside is far harder to trigger by spraying through a door gap than a motion sensor watching the whole approach. After the sensor choice come the basics: mount it so its field can’t be reached through a door gap, pair it with a door-position sensor, and seal the gaps a nozzle would fit through. Plenty of installs skip all of this, which is why a can from the cleaning cupboard stays in the bag.
Elevator keys #
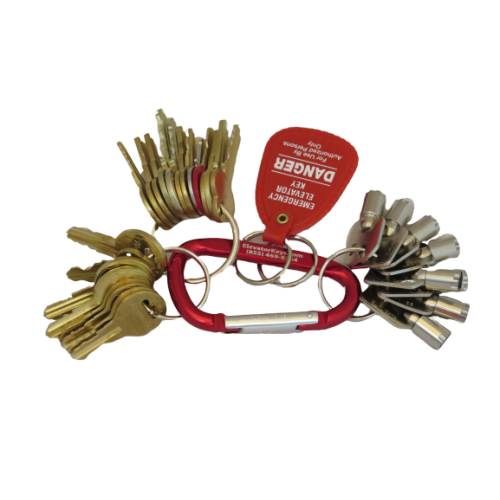
Here’s one that surprises people: a lot of elevators use the same keys. To keep fire crews able to commandeer any lift in an emergency, elevator controls are standardised, often per region, manufacturer, or fire code, into a small set of common keys (fire service keys, drop keys, and the like). The result is that a handful of keys cover a huge number of buildings, and they aren’t hard to source.
That matters because of how floor access usually works. In a secured building the elevator’s RFID reader is what stops you riding to a restricted floor. The physical key sits underneath that: it can put the car into independent or service mode, which takes it out of normal call logic entirely and lets you drive it to any floor you want, doors and all. The reader becomes irrelevant because you’re no longer asking the system’s permission, you’re operating it.
And who’s going to question the elevator technician doing his job? Certainly not the person waiting for the lift, who just wants to get to their floor. A matching badge, a hi-vis vest, and the right outfit sell it completely, and we’ll get to those in a second.
Proxmark3 (badge reader and cloner) #
Now the technical side. The Proxmark3 reads, cracks, and copies the RFID cards that run most badge systems, across both low frequency (125 kHz), the older HID Prox and EM4100 cards that often have no real security at all, and high frequency (13.56 MHz), the MIFARE family and friends. Depending on the card it can read the UID, dump the sectors, crack weak or default keys, write the data to a blank, or emulate the card outright so you don’t even need a physical copy. It’s the Swiss-army knife for badge work.
Rather than repeat all of that here, I’ve already written a full beginner’s guide on building one from source and cloning a card end to end, default keys, a live autopwn, the lot:
The one real limitation, and the reason the next tool exists, is range. Even a good HF antenna only reaches a couple of centimetres, so cloning a badge in the field means getting uncomfortably close to whoever’s carrying it.
ESP-RFID Tool (badge capture, no contact) #
This one I’m still waiting on, and it’s getting its own post when it lands.
It solves the range problem from the other direction: instead of chasing the card, you go after the reader’s wiring. A huge number of access systems still connect the reader to the door controller over Wiegand, a protocol from the 1980s that sends the credential as plain, unencrypted pulses down a couple of wires. The ESP-RFID Tool is a tiny implant you wire onto that line, usually hidden behind the reader itself, and it quietly logs every badge that gets scanned, then serves the captured data back to you over its own little Wi-Fi hotspot. Some of these implants can even replay a credential back down the wire to pop the door directly.
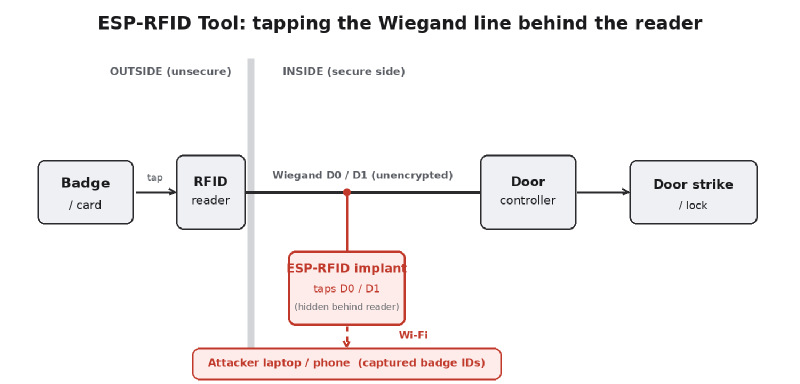
The clever part is that it taps the wire after the reader has already done the card-to-reader handshake. So it doesn’t matter how strong the card’s encryption is, DESFire, AES, whatever. You’re reading the credential the reader hands to the controller, downstream of all the crypto, where it’s back to being a plain number. The defensive answer is to retire Wiegand for OSDP, its encrypted modern replacement, and to mount readers so the wiring behind them isn’t reachable in the first place.
There’s also a catch on the install itself: some readers ship with a tamper mechanism. A spring-loaded or optical tamper switch sits behind the reader and, the moment you pull it off the wall, it trips and fires an alert to the access control system. So the act of getting to the wiring can be the thing that burns you, which is one more reason to know the exact hardware model before you reach for a screwdriver.
One serious caveat on this one: it means opening up and physically wiring into the client’s hardware. That has to be explicitly agreed in scope, in writing. Not every client wants their readers touched, and you can damage a live system if you’re careless, so this is a planned conversation, never a surprise.
Fake badges, shirts, and full costumes #

Last one, and it ties everything together: looking like you belong. Fake badges, branded T-shirts, full uniforms, a lanyard, a clipboard, a hi-vis vest. This part is unique to every client, shaped by their vendors, their dress code, and how their site actually operates, so it can’t be bought off a shelf. It has to be built for the target.
That’s where OSINT earns its keep, before you ever touch a tool:
- Badges. People love posting their first-day photo with the badge on display, or you’ll catch one in the background of a LinkedIn or press shot. One clear image is enough to reproduce the layout, colours, and logo closely enough to pass a glance at a distance, which is all a badge usually gets.
- Uniforms and vendors. Figure out who they actually trust. The cleaning company, the IT vendor that manages their network, the lift servicing firm. A shirt with that vendor’s logo beats the client’s own, because nobody questions the outside contractor they were half-expecting.
- Culture. Dress code, lanyard colours, whether the place is suits or hoodies, what the front desk looks like. Show up matching the room and you’ve already won most of the encounter.
Because here’s the uncomfortable truth that makes the whole bag work: the hook, the picks, the air can, none of them matter if the receptionist buzzes you straight through because you look the part and walk in like you own the place. The gear gets you through the doors nobody’s watching. Looking right gets you through the ones people are.
Wrapping up #
That’s the bag. No laser pencils, no exploding pens. Just simple tools, used at the right moment, by someone who did the homework on the target first. The gear is maybe a third of the job. The other two thirds are recon and the confidence to walk in like you’re meant to be there.
More physical and RFID write-ups are on the way, including the ESP-RFID Tool when it arrives and a deeper dive on the social-engineering side. If there’s a specific tool here you’d like me to break down further, let me know.